
Im letzten Artikel haben wir uns angeschaut, wie man mit Ansible einen Webserver (httpd) automatisiert installieren kann. Heute schauen wir uns an, wie man einen default vHost erstellen kann und wie man diesen anschließend mit einem SSL Zertifikat ausstattet.
Inhaltsverzeichnis
Anpassen der httpd Role Struktur
Diesmal müssen wir ein paar Dateien im Ordner files unserer Rolle hinzufügen. Das ganze sollte dann so aussehen:
1 2 3 4 5 6 7 8 9 10 | [root@ansible httpd]# tree . ├── defaults │ └── main.yml ├── files │ ├── example.com.conf │ ├── example-ssl.com.conf │ ├── index.html └── tasks └── main.yml |
Ich zeige euch hier mal schnell der Inhalt der Dateien. Da dies aber kein generelles httpd bzw. Apache Tutorial ist, werde ich diese nicht weiter erklären.
example.com.conf:
1 2 3 4 | <VirtualHost *:80> ServerName localhost DocumentRoot "/var/www/example.com" </VirtualHost> |
example-ssl.com.conf:
1 2 3 4 5 6 7 | <VirtualHost *:443> ServerName localhost DocumentRoot "/var/www/example.com" SSLEngine on SSLCertificateFile "/etc/pki/tls/certs/localhost.crt" SSLCertificateKeyFile "/etc/pki/tls/private/localhost.key" </VirtualHost> |
index.html:
1 2 3 4 5 6 7 8 | <html> <head> <title>Welcome to Example.com!</title> </head> <body> <h1>Success! The example.com virtual host is working!</h1> </body> </html> |
Anpassen der Ansible httpd Role tasks/main.yml und SSL
Um nun einen default vHost und einen entsprechenden ssl vHost auf dem System zu hinterlegen, müssen wir einige Änderungen an der tasks/main.yml durchführen.
Wir beginnen damit, verschiedene Ordner anzulegen. Diese werden wir im weiteren Verlauf mit Daten befüllen.
1 2 3 4 5 6 7 8 9 10 | - name: Create default directory file: state=directory path={{ item.path }} with_items: - path: /var/www/example.com mode: 0755 - path: /etc/httpd/sites-available mode: 0755 - path: /etc/httpd/sites-enabled mode: 0755 when: httpd_use_default_ssl or httpd_use_default |
In diesem Block kopieren wir eine zuvor erstelle index.html in den DocumentRoot unseres Webservers. Diese werden wir am Ende des Tutorials im Webbrowser aufrufen.
1 2 3 4 5 6 7 8 | - name: Copy example index.html copy: src: index.html dest: /var/www/example.com owner: apache group: apache mode: 0644 when: httpd_use_default_ssl or httpd_use_default |
Anschließend müssen wir das erste mal eine bereits vorhandene Datei erweitern. Wir fügen mit der Funktion blockinfile die Zeile „IncludeOptional sites-enabled/*.conf“ an das Ende der Datei /etc/httpd/conf/httpd.conf an.
1 2 3 4 5 | - name: modify httpd.conf blockinfile: path: /etc/httpd/conf/httpd.conf block: IncludeOptional sites-enabled/*.conf when: httpd_use_default_ssl or httpd_use_default |
Nun folgt wieder das kopieren einer Datei. Diesmal ist eine eine Standard vHost Konfiguration.
1 2 3 4 5 | - name: Copy example.com.conf copy: src: example.com.conf dest: /etc/httpd/sites-available/ when: httpd_use_default |
Nachdem wir den vHost auf dem Webserver hinterlegt haben, erstellen wir nun einen Link um den vHost zu aktivieren.
1 2 3 4 5 6 | - name: activate vHost file: src: /etc/httpd/sites-available/example.com.conf path: /etc/httpd/sites-enabled/example.com.conf state: link when: httpd_use_default |
Um SSL Verwenden zu können, müssen wir das entsprechende Modul für den Webserver installieren. Dieses wird bei der Installation automatisch auch aktiviert. Aus diesem Grund ist dafür kein gesonderter Schritt notwendig.
1 2 3 4 5 | - name: yum | install mod_ssl yum: name={{ item }} with_items: - mod_ssl when: httpd_use_default_ssl and ansible_pkg_mgr == "yum" |
Nun können wir das self-signed SSL Zertifikat erstellen. Dafür verwende ich die command Funktion von Ansible. Der Aufruf von openssl ist so, wie er auch manuell ausgeführt wird. Auf eine Erklärung im Detail verzichte ich an dieser Stelle.
1 2 3 | - name: generate self-signed certificate for ssl command: openssl req -new -nodes -x509 -subj "/C=DE/ST=State/L=City/O=IT/CN=localhost" -days 3650 -keyout /etc/pki/tls/private/localhost.key -out /etc/pki/tls/certs/localhost.crt -extensions v3_ca creates=/etc/pki/tls/certs/localhost.crt when: httpd_use_default_ssl |
Nachdem wir die Vorbereitung für SSL abgeschlossen haben, können wir nur eine Beispieldatei für den SSL vHost kopieren.
1 2 3 4 5 | - name: Copy example.com.conf copy: src: example-ssl.com.conf dest: /etc/httpd/sites-available/ when: httpd_use_default_ssl |
Auch dieser vHost wird anschließend wieder aktiviert.
1 2 3 4 5 6 | - name: activate vHost file: src: /etc/httpd/sites-available/example-ssl.com.conf path: /etc/httpd/sites-enabled/example-ssl.com.conf state: link when: httpd_use_default_ssl |
Zu guter letzt starten wir den Webserver einmal neu.
1 2 3 4 | - name: restart httpd service: name: httpd state: restarted |
Anpassen der Ansible httpd Role defaults/main.yml
Nun legen wir noch die entsprechenden Variablen für die beiden default vHost an. Mit diesen können wir dann entscheiden ob der default vHost mit oder ohne SSL installiert wird.
1 2 | httpd_use_default: true httpd_use_default_ssl: true |
Ausführen der Rolle
Als erstes wollen wir nur den default vHost ohne SSL auf unserem System installieren. Dafür setzten wir die entsprechende Variable in der sites.yml. Diese sieht dann wie folgt aus.
1 2 3 4 5 6 7 8 | - name: httpd hosts: httpd remote_user: root roles: - httpd vars: - use_perl: true - httpd_use_default: true |
Das ganze rufen wir dann wie im Tutorial zuvor mit ansible-playbook auf. Die Ausgabe sieht wie folgt aus:
1 2 3 4 5 6 7 8 9 10 11 12 13 14 15 16 17 18 19 20 21 22 23 24 25 26 27 28 29 30 31 32 33 34 35 36 37 38 39 40 41 42 43 44 45 46 47 48 49 50 51 52 53 54 55 56 57 58 59 60 61 62 63 | ansible-playbook site.yml -i hosts PLAY [httpd] ******************************************************************* TASK [Gathering Facts] ********************************************************* ok: [192.168.10.90] TASK [httpd : yum | install httpd] ********************************************* ok: [192.168.10.90] => (item=[u'httpd', u'httpd-tools']) TASK [httpd : yum | install of fcgid] ****************************************** ok: [192.168.10.90] => (item=[u'mod_fcgid', u'mod_ruid2']) TASK [httpd : Enable common httpd modules] ************************************* ok: [192.168.10.90] => (item=proxy) ok: [192.168.10.90] => (item=proxy_fcgi) ok: [192.168.10.90] => (item=rewrite) ok: [192.168.10.90] => (item=filter) ok: [192.168.10.90] => (item=deflate) ok: [192.168.10.90] => (item=headers) TASK [httpd : Enable fcgid httpd module] *************************************** ok: [192.168.10.90] => (item=cgi) ok: [192.168.10.90] => (item=fcgid) ok: [192.168.10.90] => (item=suexec) TASK [httpd : Create default directory] **************************************** changed: [192.168.10.90] => (item={u'path': u'/var/www/example.com', u'mode': 493}) changed: [192.168.10.90] => (item={u'path': u'/etc/httpd/sites-available', u'mode': 493}) changed: [192.168.10.90] => (item={u'path': u'/etc/httpd/sites-enabled', u'mode': 493}) TASK [httpd : Copy example index.html] ***************************************** changed: [192.168.10.90] TASK [httpd : modify httpd.conf] *********************************************** changed: [192.168.10.90] TASK [httpd : Copy example.com.conf] ******************************************* changed: [192.168.10.90] TASK [httpd : activate vHost] ************************************************** changed: [192.168.10.90] TASK [httpd : yum | install mod_ssl] ******************************************* skipping: [192.168.10.90] => (item=[]) TASK [httpd : Create default ssl directory] ************************************ skipping: [192.168.10.90] => (item={u'path': u'/etc/httpd/ssl', u'mode': 493}) TASK [httpd : generate self-signed certificate for ssl] ************************ skipping: [192.168.10.90] TASK [httpd : Copy example.com.conf] ******************************************* skipping: [192.168.10.90] TASK [httpd : activate vHost] ************************************************** skipping: [192.168.10.90] TASK [httpd : restart httpd] *************************************************** changed: [192.168.10.90] PLAY RECAP ********************************************************************* 192.168.10.90 : ok=11 changed=6 unreachable=0 failed=0 |
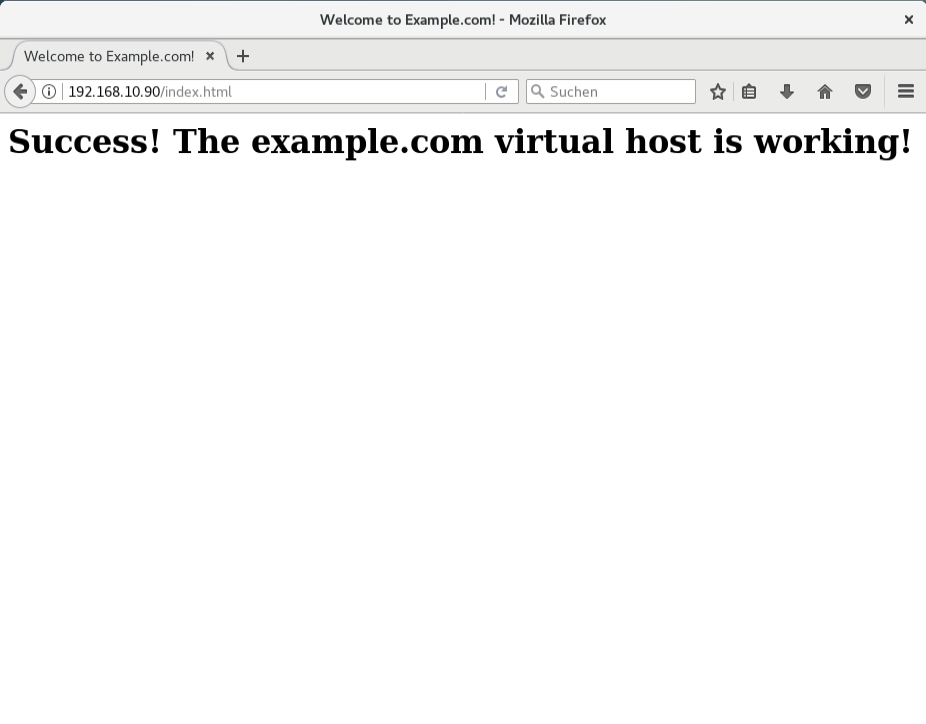
Nun können wir im Browser unsere Beispiel index.html aufrufen.
Als nächstes versuchen wir den vHost mit SSL zu installieren. Dafür fügen wir wieder die entsprechende Variable in unsere sites.yml ein.
1 2 3 4 5 6 7 8 9 | - name: httpd hosts: httpd remote_user: root roles: - httpd vars: - use_perl: true - httpd_use_default: true - httpd_use_default_ssl: true |
Anschließend führen wir wieder ansible-playbook aus.
1 2 3 4 5 6 7 8 9 10 11 12 13 14 15 16 17 18 19 20 21 22 23 24 25 26 27 28 29 30 31 32 33 34 35 36 37 38 39 40 41 42 43 44 45 46 47 48 49 50 51 52 53 54 55 56 57 58 59 60 61 62 63 | ansible-playbook site.yml -i hosts PLAY [httpd] ******************************************************************* TASK [Gathering Facts] ********************************************************* ok: [192.168.10.90] TASK [httpd : yum | install httpd] ********************************************* ok: [192.168.10.90] => (item=[u'httpd', u'httpd-tools']) TASK [httpd : yum | install of fcgid] ****************************************** ok: [192.168.10.90] => (item=[u'mod_fcgid', u'mod_ruid2']) TASK [httpd : Enable common httpd modules] ************************************* ok: [192.168.10.90] => (item=proxy) ok: [192.168.10.90] => (item=proxy_fcgi) ok: [192.168.10.90] => (item=rewrite) ok: [192.168.10.90] => (item=filter) ok: [192.168.10.90] => (item=deflate) ok: [192.168.10.90] => (item=headers) TASK [httpd : Enable fcgid httpd module] *************************************** ok: [192.168.10.90] => (item=cgi) ok: [192.168.10.90] => (item=fcgid) ok: [192.168.10.90] => (item=suexec) TASK [httpd : Create default directory] **************************************** ok: [192.168.10.90] => (item={u'path': u'/var/www/example.com', u'mode': 493}) ok: [192.168.10.90] => (item={u'path': u'/etc/httpd/sites-available', u'mode': 493}) ok: [192.168.10.90] => (item={u'path': u'/etc/httpd/sites-enabled', u'mode': 493}) TASK [httpd : Copy example index.html] ***************************************** ok: [192.168.10.90] TASK [httpd : modify httpd.conf] *********************************************** ok: [192.168.10.90] TASK [httpd : Copy example.com.conf] ******************************************* ok: [192.168.10.90] TASK [httpd : activate vHost] ************************************************** ok: [192.168.10.90] TASK [httpd : yum | install mod_ssl] ******************************************* changed: [192.168.10.90] => (item=[u'mod_ssl']) TASK [httpd : Create default ssl directory] ************************************ changed: [192.168.10.90] => (item={u'path': u'/etc/httpd/ssl', u'mode': 493}) TASK [httpd : generate self-signed certificate for ssl] ************************ ok: [192.168.10.90] TASK [httpd : Copy example.com.conf] ******************************************* changed: [192.168.10.90] TASK [httpd : activate vHost] ************************************************** changed: [192.168.10.90] TASK [httpd : restart httpd] *************************************************** changed: [192.168.10.90] PLAY RECAP ********************************************************************* 192.168.10.90 : ok=16 changed=5 unreachable=0 failed=0 |
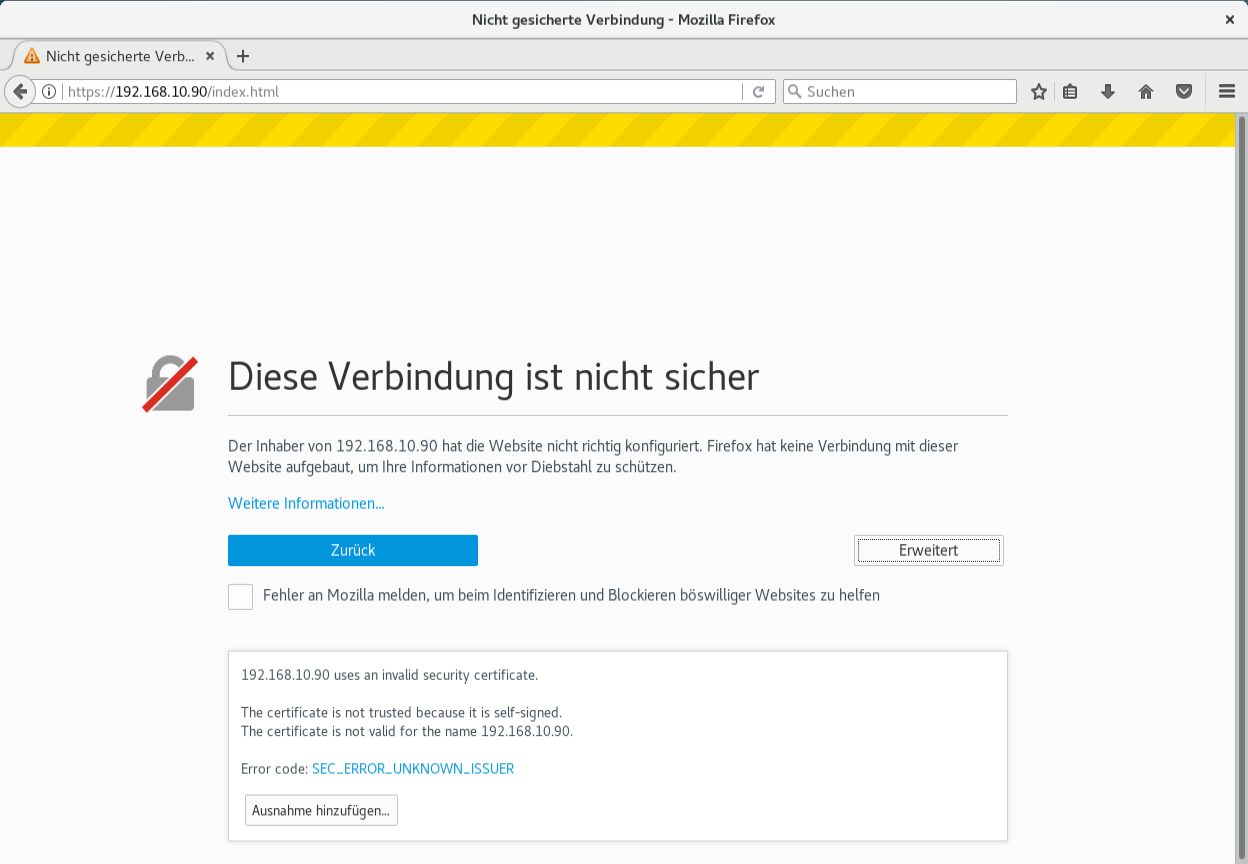
Wen wir die IP Adresse nun mit https aufrufen, sehen wir den typischen Hinweis für ein self-signed Zertifikat. Wenn wir dieses bestätigen, können wir mit https auf die Seite surfen.
Das ganze gibt es auf GitHub für euch zum Download.
Video
Im nächsten Artikel beschäftigen wir uns dann mit dem Thema Ansible – vHost mit Jinja2
Schreibe einen Kommentar